Filters make it easier for you to find the data you are looking for.
You can filter the data on basic criteria like Chain, Category, Product, Promotion State, Period, and many more.
Below, we will go through the Promotions filters and the POS report filters.
See also how to save a filter, which can be used for scheduled tasks or quick loading of reports.
🔴OBS! Filters are stored when navigating between the different modules in effectmanager. A filter from Scheduler also applies in Reports. Filters are stored when you log out of effectmanager.
👍Pro-tip: If you are having trouble finding your promotions, make sure to check your filters. Try clearing the filter and inputting your criteria again.

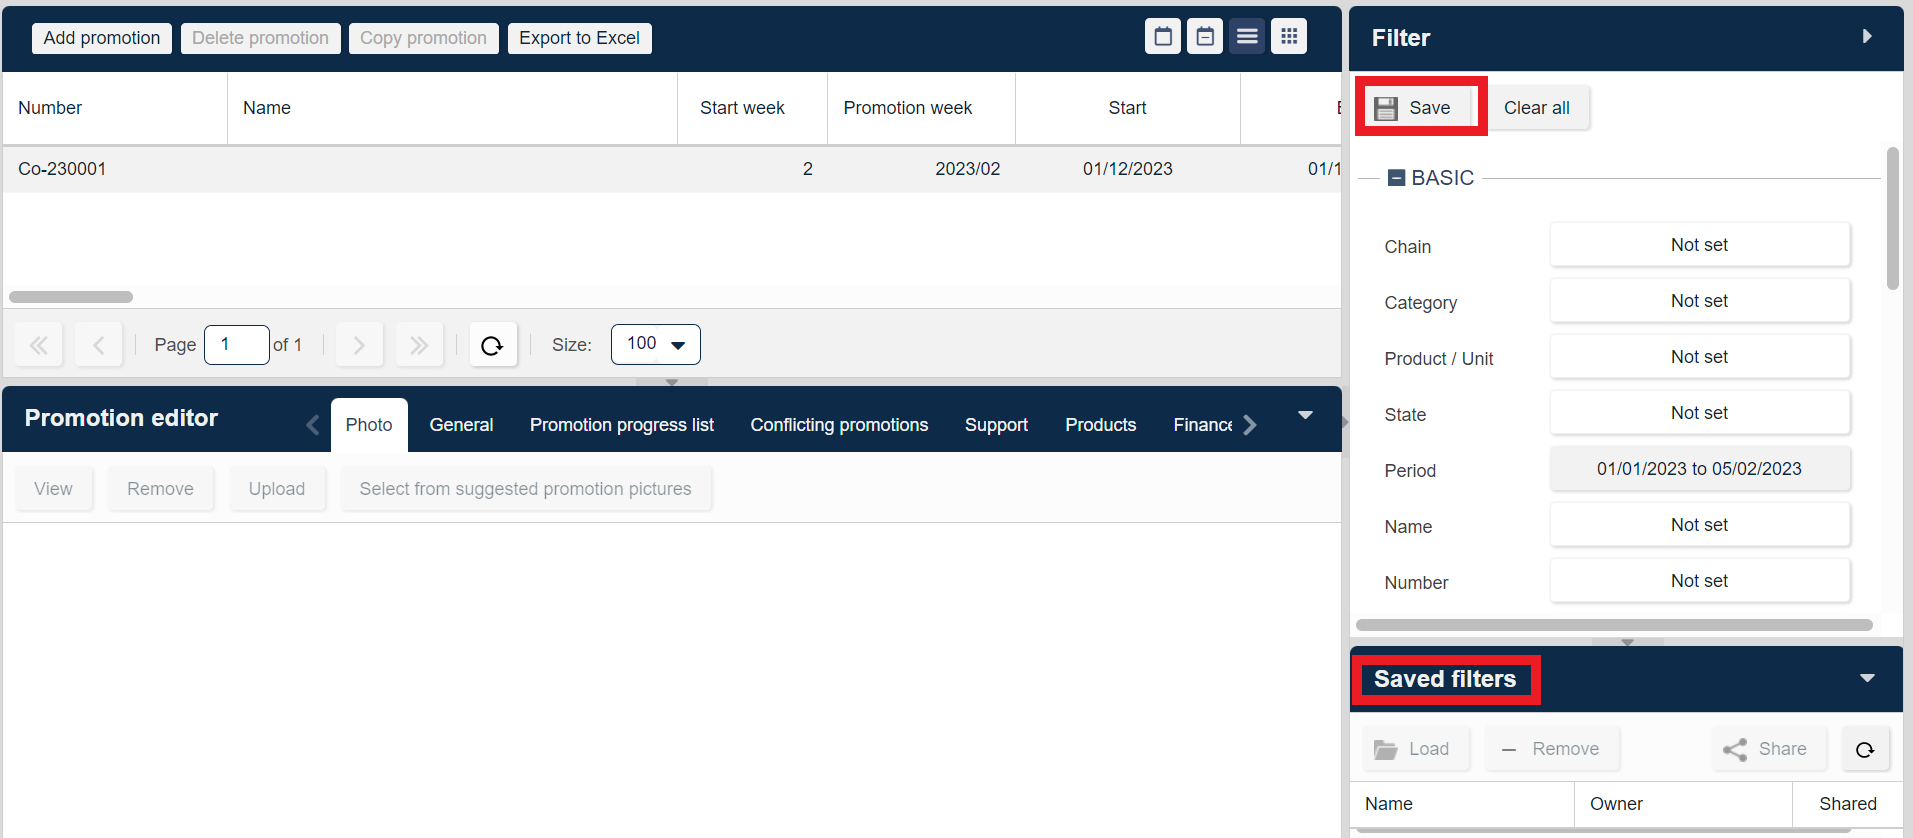
Saved Filters
If you use specific search criteria from the filters regularly or need them for a scheduled task, we recommend that you save the filtering options and save them with a descriptive name. For example, Sales Weekly_Sales rep name.
You save a filter by selecting your filtering criteria and pressing Save.
You will find your saved filter under Saved Filters at the bottom.
If you need a guide that shows you how to schedule task, please see our guide How to schedule a task/report in effectmanager
Pro-Tip: If you save a filter, we recommend that you select a Dynamic Period. This way, the filter will be dynamic instead of static.
Promotion Filters
When searching for your Promotions in Scheduler or using the Promotion Reports in the Report module, you can use Promotion filters to find the promotions or their key figures. Promotion filters are divided into basic filters and detailed filters. Below, we will go through the different promotion filters.
Basic Filters
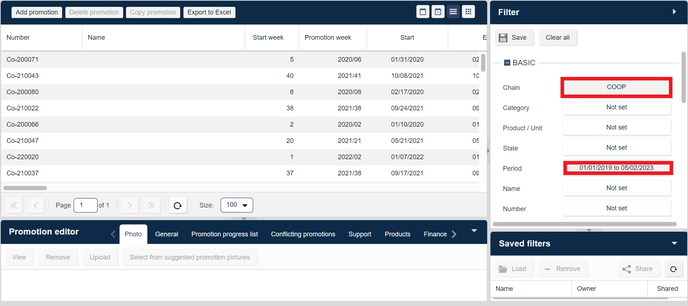
Chains are one of the most commonly used filters. You can filter on both the wholesaler and chain levels. You can filter on multiple chains and also on multiple stores across chains. This is a great filter to use if you are looking for an overview of a specific store or chain.
The example below, shown in List View, provides a perfect overview of promotions in Coop YTD.
Category and Product/Unit filters correspond with categories and products, and units created in effectmanager. This filter is great to use if you are looking for promotions within a specific category or a promotion that contains specific products or units. In the Products/unit filter, you can also search for your Units created in effectmanager.
The example below, shown in List View, provides an overview of all promotions in the 1,5 L category with the product Lime & Elder Flower 1,5 L.

State equals the state of the promotion: Planned, Confirmed, Completed, Cancelled, or Simulated. This filter is great to use if you need an overview of promotions in a certain state. It can be to see all your confirmed promotions for a specific customer and export them in an Excel file, so your customer has an overview.
NB! It is important to remember to change the state of your promotions to completed. POS data for promotions is only updated automatically for completed promotions.
The example below, shown in List View, provides an overview of all planned promotions for Coop in the given period.

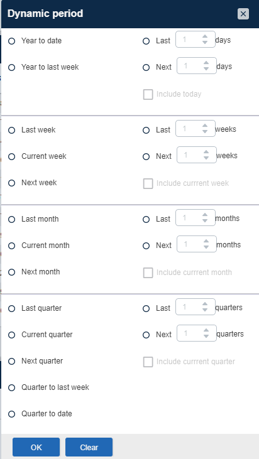
A period is always pre-selected in all filters in effectmanager. The period is saved when navigating to the Report module in effectmanager. You also have the option to use a dynamic period. You can select the dynamic period filter by pressing Dynamic period.
👍Pro-Tip: Dynamic filters are great to use for Saved Filters, Scheduled Tasks, or Quick Access to a previous period.
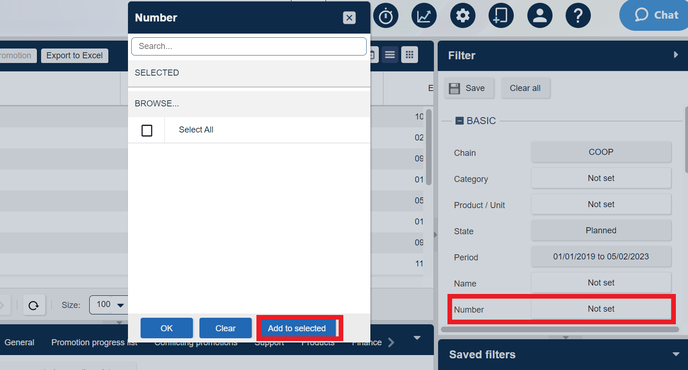
Name and Number filters are great to use if you know which promotions you want to look at.
The name of the promotion is provided by you when creating or editing the promotion.
The number is generated by effectmanager when creating or copying a promotion.
When entering a name or number in the search filter, you can select more than one by pressing Add to selected.
🔴OBS! If not all the added promotions are shown, you need to clear some of your other filters.
The example below shows a search for promotions by different numbers and how to add different promotion numbers to the search.
Detail Filters
Progress and Exclude Progress filters are great to use if you want to filter on checklist items from the Promotion Progress list in the Scheduler.
The example below shows a search for completed promotions, where sales out have been read in, but settled promotions are excluded, so I now know which promotions I need to act on.
NB! It is important to remember to change the state of your promotions to completed. POS data for promotions are only updated automatically for completed promotions.

Type and Mechanism filters are great to use if you want to see a specific type of promotion or promotions with a particular mechanism.
The example below shows a search for In-Store promotions in Bilka, where the Mechanism is selected as Buy X for Amount Y.
👍Pro-tip: If you are having trouble finding your promotions, make sure to check your filters. Try clearing the filter and inputting your criteria again.

Categorization filters: Category, Brand, Optional 1-4 can be used if you want to see promotions within a specific category or brand. In these filters, you will find the categorization that you have enriched your products with.
It is the same category as you find in the Basic filters. Categories correspond to the categories provided in the product creation.
If you need a guide that shows you how to maintain the categorizations of your POS data. Please see our guide How to maintain categorization of POS data
The example below shows a search for promotions in Bilka within the two categories, 0.5 L and 1.5 L, within the Brand Coconut Water.

POS filters
To the top of the article
When searching for key figures in your POS reports, you can use POS filters to narrow your search. POS filters are divided into Shop filters, Category filters, and Date filters. Below, we will go through the different POS filters.
Shop filters
To the top of the article
Shop filters are all related to the shops where you have POS sales. In this section, you will find filters for Chains, Shop, Salesperson, etc.
Wholesaler, Chain, and Shop provides you with the opportunity to look at sales figures at the wholesaler, chain, or shop level for a specific period. In these filters, you will find the wholesalers and stores where you have POS sales.
Chain and Shop filters can be used without selecting the wholesaler. The Shop filter can be used without using a wholesaler/or chain filters. But the filters are correlated. If you choose Coop as a wholesaler, you can only find Chains and stores within Coop.
The example below shows a POS report for Turnover per week for a specific store.
👍Pro-tip: If you get an empty POS report, make sure to check your filters. Try clearing the filter and inputting your criteria again.

District, Salesperson, and Visitation allow you to filter your POS reports on criteria from your field force. These filters are codependent, meaning your selection in the District filter will only allow you to choose Salespersons that are connected to this District.
If you have corrections to your Field force, please see our guide How to maintain your field force in effectmanager
In the example below, the District and Salesperson are added to the filters. Providing a Turnover per week for Coop in District East for Salesperson Bjarne.

Category filters
Category filters: Segment, Brand, Optional 1-4 can be used if you want to see key figures within a specific category or brand. In these filters, you will find the categorization that you have enriched your products with.
The category corresponds to the wholesaler categories in the POS files.
Segments correspond to the categories provided in the product creation.
If you need a guide that shows you how to maintain the categorizations of your POS data. Please see our guide How to maintain categorization of POS data
The example below shows the POS report Turnover per Week in Coop within the segment 0,2 L. 
Date Filters
A period is always pre-selected in all filters in effectmanager. The period is saved when navigating between the different modules in effectmanager. You can select a preferred period or use the dynamic period filter by pressing IDA Dynamic period.
🔴OBS! Be aware of the selected filter in connection with your POS report. If you use the weekly reports and select a period that spans the weeks, it will include a sum of the data from the selected weeks.
👍 Pro Tip: IDA Dynamic filters are great to use for Saved Filters, Scheduled Tasks, or Quick Access to a previous period.

Download our printer-friendly guide here